
There are two general growth habits among orchids – sympodial and monopodial – and how you pot up plants differs a bit between them.
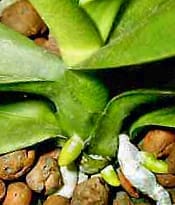
Sympodial plants – cattleyas, dendrobiums, etc. – grow on a rhizome, with each plant maturing and blooming individually. Those that are currently on the plant that have already bloomed will generally not do so again, although there are some exceptions, most notably in dendrobiums. The time to repot is after blooming, when new growth has begun and you can see the “nubs” of new roots forming. In the case of monopodial plants like phalaenopsis or vanda, which only have a single growth that will bloom again and again, look for the emergence of new roots as your signal.
If the older growths of sympodial plants – those on the opposite end of the “chain” from where it is blooming – are old and very shriveled, it is safe to cut the rhizome and throw them away. The older pseudobulbs do serve as “storage tanks” for the rest of the plant, and still provide some photosynthesis, and this is true even if they have lost their leaves. If they are too far gone however, they may be removed.
If the plant is large, with six or more pseudobulbs with leaves, you might consider dividing it into two clumps, and the old “back bulbs” might sprout new growth, giving you another plant to enjoy or share. Never reduce the plant to less than three bulbs plus a new growth.
- Water the plant well, wait 30 minutes and water it again. That softens to root mass and old medium. If the plant is already in Semi-Hydroponic culture using an inert medium like PrimeAgra, this may not be needed at all.
- Remove the pot. If it’s clay, give it a few good whacks and break it up. It’s easier to pick of chards than to slide the plant out of the pot. If the plant is currently in Semi-Hydroponics, it will easily slide from the pot with minimal coaxing.
- Remove as much of the old medium as you can, being careful to pry it away from the roots without breaking them. Don’t worry too much of you do break them, just try to keep it to a minimum, and if you do break them, cut them off at the break. (I will sometimes trim roots of a healthy plant on repotting, as it tends to cause root branching, which helps get it reestablished.) If the plant is in Semi-Hydroponic culture, it is not necessary to remove the attached medium, as it cannot decompose.
- Using a clean sterile blade or scissors, cut off any rotted or rotting roots. Good ones will be thick, firm, and white or green, although they could be discolored by the medium. Bad ones will be black or brown, soft and mushy, or if the velamen has already completely deteriorated, they’ll appear only as a central “string.” Try to untangle the roots as much as possible.
- Once the cleaning and trimming is done, I find it useful to dab the broken or trimmed root ends with cinnamon, which acts to dry the wounds and is a marvelous fungicide. The same is true of places where you cut the rhizome. (Note: dust only the wounds, as cinnamon can desiccate healthy roots.)
- The pot you use should have room for 2-years’ growth, which you can estimate from the plant size. If the plant has 1″ between pseudobulbs, and you have four bulbs with a total length of about 3 inches or so, then a five- or six-inch pot will do. Try not to overpot, as that can sometimes delay the reestablishment of the plant. For monopodial plants, select a pot that is about one- to two inches in diameter smaller than the total leaf span of the plant. (For some reason, overpotting does not appear to be as much of an issue with Semi-Hydroponics, but it still pays to stay within those guidelines.)
- If you are using a traditional bark-based medium (even if that “bark” is coconut husk chips), place some crockery in the bottom of the pot for drainage. Those shards of the broken flower pot will work great. If you are using sphagnum, that is also a good idea, but if you’re going into Semi-Hydroponics, do not add any filler to the bottom of the pot.
- Prewet your medium. For bark, pour boiling-, or at least very hot water over it and let it stand for 15 minutes, then repeat. I also premoisten moss with hot water, and then wait until it cools before use. Moss must be damp, but not sopping. PrimeAgra gets soaked overnight as well, although hot water is not necessary. In all cases, I add one tablespoon per gallon of KelpMax™ per gallon of the soaking/wetting solution to spur on root growth.
- Depending upon the potting medium:
- For plants going into bark:
- For sympodial plants, place and tamp down a mound of medium to the side of the pot, so it’s deep at the side and shallow toward the middle. Place the “back end” of the plant right up against the side of the pot on top of the medium, with the newest growth toward the center of the pot. Add more medium to the pot, being certain to fill the spaces in-, around- and between the roots, tamping gently as you do. Continue adding medium until the rhizome is sitting right on top of it.
- For monopodial plants, center a mound of medium in the pot, making it tall enough that the plant can be placed right on top of it. “Fan” the roots down and around the mound, and add and tamp medium until it’s level.
- Either way, water the plant thoroughly, and let it drain. If you added Kelpak to your presoaking solution, use that for this initial watering.
- If using sphagnum, I prefer to fill the spaces between- and surround the roots before putting it in the pot, keeping the same up-against-the-wall or centered positioning, as appropriate for the plant. Make the whole “ball” about the size of the pot, and then stuff it in. The moss should be packed firmly enough to provide support, but not so tightly that it restricts air flow to the roots. Assuming you moistened the moss adequately, no “watering-in” is needed.
- For plants going into bark:
- If you are moving into Semi-Hydroponics, hold the plant in position and pour medium into the pot, shaking it gently to move the particles of the medium in between the roots. Keep adding until full. Fill the pot with water and let it drain, leaving the reservoir full.
Place the newly-repotted plant in “mild” conditions – shady, humid, and warm – and do not permit the medium to dry out. Sometimes it is a good idea to place a plastic bag over the plant and pot to simulate a mini-greenhouse, if you feel that it will be difficult to provide the right conditions otherwise. If you prepared your medium correctly, and the plant is in a proper location, your plant should be established and ready to go back to its normal growing conditions in a few weeks.