If you grow in the home, you have probably found the advantages of using standard horticultural trays like those we have in “The Store,” for organizing your plants or simply for catching drips when you water. Folks use them for “humidity trays” too, but my article on evaporation and related ones explain the ineffectiveness of that concept. Sometimes, however, the water level can get too high, overflowing right onto the floor. Here’s a method of creating tray drains we used to control the level:
Parts needed:
- Tray,
- Several feet of clear, 3/8″ OD vinyl tubing
- Silicone glue
- Bucket.
Tools needed:
- Drill with 3/8″ bit.
- Drill hole in bottom of tray. I usually did so in one corner of the tray, in one of the depressed grooves provided for drainage, but the location is not critical.
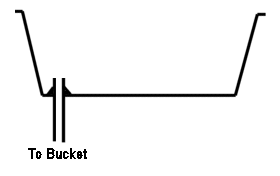
- Insert the tubing through the hole, keeping the top of the tubing 1/4 to 1/2″ inside the tray, with the remainder going out through the bottom.
- Silicone the tube into place, being sure to get a good seal.
- Let dry per glue label.
It will look something like this:

When it’s ready, put the tray on your stand, and place the long end of the tubing into your bucket to catch the overflow.
If you want to keep the trays on a flat countertop, drill the hole in the side of the tray instead, and don’t let the tubing protrude as far from the wall. It’s probably a good idea to add extra silicone to the outside for mechanical support. We recommend having the drain hole as close to the bottom as possible.
